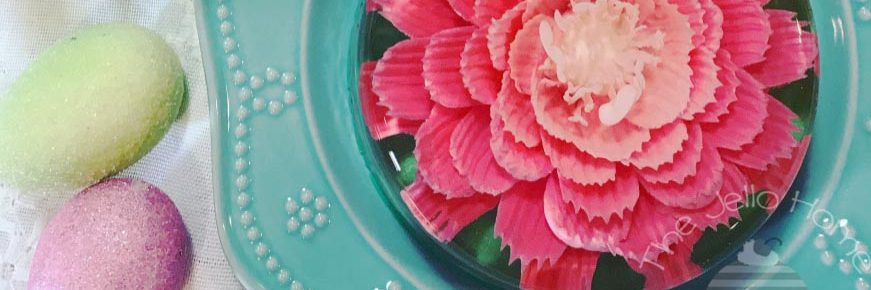
My daughter’s Jr. High teacher assigned the class to make a a color wheel. It could as simple as a crayon coloring or as intricate as they wanted to make it. The teacher even said they could make it edible. So of course, my daughter decided to make a color wheel from gelatin with 12 different colored flowers all made with different tips.
First, she made a clear gelatin base in a vintage jello ring Tupperware mold. Click here for the recipe for a great tasting clear gelatin base. Or scroll to the bottom for both recipes used in this project.


Second she made the colored gelatin with the three primary colors and a white base. Click here for the colored gelatin recipe or scroll to the bottom.

We put the colored gelatin in cups in a large saucepan of warm water on low heat on the stove. This keeps the gelatin at a liquid state giving her time to create the intricate designs and flowers. We also put a cup with just water in it in the warm water. We use this to clean out the syringes and needles so that the gelatin doesn’t dry and clog the needles.

Before beginning the flowers, she marked 12 places around the gelatin for each flower and carved out a little of the gelatin at each spot. This helped her make sure each flower was evenly spaced. Carving out the gelatin helps keep the excess gelatin from running all over the top of the clear gelatin and makes a center for the flowers.

For her assignment, she had to include the primary colors, secondary colors, and the tertiary colors. She used liquid food coloring to make the primary colors and then mixed the three colors to get the desired secondary and tertiary colors. She also wanted to play around with different tips for the jello flowers and used a different tip for each color.

The result was a stunning rainbow of colors in a beautiful clear gelatin. It turned out fabulous and it was made by a 12 year old!


She took it to school and got an A for a great project with top marks for creativity and uniqueness.

Her teacher kept the jello in the foods fridge throughout the day and she picked it up after school. She shared it with her friends at the school play practice and it disappeared quickly. The plate still showed remnants of the fun color wheel when she got home.

Want to make your own color wheel jello? It’s pretty easy. First make the recipe for clear gelatin in a ring mold or bowl of your choice. Then make the Colored Base Gelatin to make the colored flowers.
You can use a clean sterile syringe and straight needle or you can check out some of these beginner tools on Amazon to get you started:
*Yes, I have an Amazon Influencer’s account and make a tiny commission off of your purchase. Honestly, it’s not much, last month (December 2020, I made about $20.00.) I greatly appreciate your add clicks and purchases, they help to offset the cost of running a private blog.

Clear Gelatin
Equipment
- medium saucepan
- medicine dropper
- bowl
- small whisk
Ingredients
- 3 Tbsp clear gelatin powder
- 2 C sugar
- 4 C water
- 1 tsp citric acid powder
- 3 drops clear food flavoring
Instructions
- Mix gelatin with 1 cup of the cold water in a small bowl and let it sit for 10 minutes. In a saucepan, heat sugar with citric acid powder and remaining 3 cups of water. Stir until the sugar is dissolved. Remove from heat when vapor begins to appear above the surface. Do not let it come to a boil. Take off heat.Add gelatin to saucepan and stir until completely dissolved. Using a medicine dropper, stir in just 3 drops of food flavoring. Go ahead and taste it to make sure flavor is right. Pour into desired containers and leave in the refridgerator until set.

Colored Base for Gelatin Flowers
Equipment
- Syringes
- Needles or Flower Tips
- Pan on the stove with a warm water bath to keep gelatin from setting up
Ingredients
- 1 Tbsp gelatin powder
- 3 Tbsp cold water
- 1 Cup heavy whipping cream
- 1/2 Cup sugar
- 1 drop food flavoring
- 3/4 Tbsp white food coloring
Instructions
- First, make the clear gelatin recipe and make sure it is set before you begin creating the colored gelatin for the flowers.
- Mix gelatin with cold water and let stand for 5 minutes.
- Heat sugar with 1/2 Cup of cream in a sauce pan, stirring constantly. Remove from heat when vapor appears above the surface, do not let it boil.
- Add gelatin and stir until completely dissolved, then add the remaining 1/2 Cup of cream.
- Stir in one drop of food flavoring.
- Mix in the white food coloring using an emulsion blender, or a regular blender if you don't have an emulsion blender.
- Put back onto the stove on a very low heat to keep the gelatin warm. Stir occasionally.
- Get the clear gelatin out of the refridgerator. Cut a small circular hole in the middle of the top of the set clear gelatin.
- Pour some of the colored gelatin base into a small bowl or glass. Color it with food coloring.
- Using a syringe and a needle, inject the colored gelatin into the clear gelatin base. Play around with different techniques and designs and colors. It is easier than it looks and fun to create.
- Keep the colored gelatin woarm in the water bath while you are creating with other colors. You don't want the gelatin too hot or too cold. Also having boiling water in a couple other cups in the water bath is good to clean the needles and syringes when needed so they don't get clogged.
- Have fun!
The Best Meatloaf Meatballs, My Kids Favorite Easy Dinner
One of the most requested dinners at our house is homemade meatballs. My kids love these, even my kids who aren’t big meat eaters.

I adapted this recipe from a meatloaf recipe my cousin Skye O. put in the family cook book 11 years ago. I think I was running short on time and decided to make meatballs instead of meatloaf to decrease the cooking time. It was a hit. I also increased the sauce to make sure the meatballs all get covered.
This is an easy recipe that takes a little time to prep, but is so delicious.
They aren’t Italian, or Spicy, or Vegan, but they are covered in Brown Sugar and tomato sauce and are sweet and mouthwatering. We love to eat them over rice, or our favorite, Quinoa Rice.
Most ingredients can be found in your pantry or fridge. I have also added extra veggies and fresh herbs, like shredded zucchini or basil at times. My kids still loved them.
I hope you enjoy this family favorite recipe. Play around with it by adding some of your favorite herbs and veggies. It is sure to please.
List of Ingredients:
- 2 eggs
- 2/3 C. milk
- 3 slices of bread, torn into pieces
- 1/2 C. chopped onion
- 1/2 C. grated carrot
- 1 C. shredded cheddar or mozzarella cheese
- 1 T. chopped parsley
- 1 tsp. salt
- 1/4 tsp. pepper
- 1 1/2 lb. ground pepper
- 1 1/2 lb. ground beef
- 2 cans (8 oz each) tomato sauce
- 1 C. packed brown sugar
- 2 tsp. prepared mustard

To start, spray a pan with non-stick cooking spray and set the oven to 350 degrees.
Start by beating the eggs and milk together. Tear 3 pieces of bread into small pieces and add it to the egg mixture. Let this sit for a few minutes to allow the liquid to soak into the bread. I like to use the ends of the bread loafs when making this recipe.

Grate the carrots and chop the onions while waiting for the milk to soak into the mixture. Then stir in the veggies, cheese, herbs, and seasonings.

Add the meat and mix well.


I like to use a medium cookie baller to make the meatballs. It’s easy, and a lot less messy than rolling them by hand. You can also buy tools to make round meat balls and super fast meat balls on Amazon: check out these links below:
*Yes, I have an Amazon Influencer’s account and make a tiny commission off of your purchase. Honestly, it’s not much, last month (December 2020, I made about $20.00.) I greatly appreciate your add clicks and purchases, they help to offset the cost of running a private blog.
Once you have all the meatballs made, put them in the oven for 15 minutes.

While the meatballs are in the oven, make the sauce. It’s just two small cans of tomato sauce, one cup of brown sugar, and 2 teaspoons of mustard. Mix together in a medium mixing bowl.

Once the meatballs have been in the oven for 15 minutes, pour the sauce over the meatballs and return them to the oven for another 15 minutes. Double check to make sure you didn’t accidentally turn the oven off after the first 15 minutes.

Serve over rice or with potatoes. My kids love this recipe and will eat about 4-5 meatballs each. I hope you love these.

To make this recipe into Meatloaf instead of Meatballs:
- Form mixture into one large loaf.
- Cut the sauce recipe in half.
- Bake first for 45 minutes, add sauce, then bake for another 30 minutes.
- Occasionally spoon the sauce over the meatloaf.

Meatloaf Meatballs
Ingredients
- 2 eggs
- 2/3 C milk
- 3 slices of bread torn into pieces
- 1/2 C chopped onion
- 1/2 C grated carrot
- 1 C cheddar or mozzarella cheese shredded
- 1 T chopped parsley
- 1 tsp salt
- 1/4 tsp pepper
- 1.5 lbs ground beef
- 1 C tomato sauce
- 1 C brown sugar
- 2 tsp prepared mustard
Instructions
- Spray shallow cooking pan with non-stick cooking spray and heat oven to 350°F.
Meatballs
- In a large bowl, beat the eggs and milk together.
- Add bread and let stand a few minutes to allow the liquid to absorb into the bread.
- Meanwhile, chop the onions and grate the carrots if needed.
- Stir in the onions, carrots, cheese, herbs, and seasonings.
- Add beef and mix well.
- Shape mixture into meatballs and place on pan.
- Bake in oven and set a timer for 15 minutes.
Sauce
- In a medium mixing bowl, combine tomato sauce, brown sugar, and mustard.
- When the meatballs have cooked for 15 minutes, take them out of the oven, cover them in the sauce and return them to the oven for another 15 minutes or until cooked.
- Enjoy with rice or potatos.
If you liked this recipe, check out our favorite Blueberry Muffins, Banana Chocolate Chip Muffins, and Wisconsin Cauliflower Soup Recipes.


14 Day Expert Sweet Pickle Recipe – My Favorite Food


Ever since I was a kid, my Grandma’s sweet pickles have been my favorite food. I love these crunchy morsels of flavor! Every family party had a bowl of these served in one of my grandma’s glass jelly bowls. They remind me of family and parties and holidays. But most of all they remind me of my grandma. She is living at my parents house now and getting a little forgetful. I’m glad that I was able to learn how to make her pickles from her many years ago.
Expert Sweet Pickles are no easy task. It takes planning and dedication to pull these off. Since my grandma can’t make it around to everybody’s house to teach you how to make these, I will walk you through this step by step.
Click here to watch a video of how I make the sweet pickles.

First and most importantly, is the planting of the right kind of cucumbers. You can buy pickling cucumbers from my local fruit stands in the summer but it is so expensive!!! If you can grow your own garden, I highly recommend buying a little package of seeds and growing your own cucumbers.
My grandma would always plant Marketmore 76 Cucumbers and that is what I like to plant also. If you don’t have Marketmore 76 cucumbers, you want small pickling cucumbers. Not large slicing cucumbers. I have tried this recipe with other cucumbers but do prefer the Marketmore 76 for taste, texture, and crunch.
I like to plant a few hills of cucumbers. The more the merrier. You will want to pick the cucumbers when they are little about 3-4 inches long. Sometimes I have larger cucumbers that have been hidden “sneaky cucumbers”, I cut them in half and use them but not large fat cucumbers. Those are best to be sliced and eaten fresh on a salad or fed to the bunnies.

I pick the cucumbers in my garden every 3 to 4 days. Sometimes I don’t have enough cucumbers to make a batch of pickles. I’ll put the cucumbers in bag in the fridge to keep them fresh until I can pick more cucumbers and have a larger batch. It’s best to have 50-75 cucumbers in a batch of pickles.
Day 1: After you have picked enough cucumbers, wash them and place them in a pickling crock or a bucket. I use a 3 gallon stone crock that is made for preserving foods. However, these can be a little pricy so when I have two batches going at once, I use a 2 gallon bucket for whichever batch is smaller.


Next, I make a batch of salt water (salt brine). I typically use Morton Canning and Pickling Salt. Whatever you use, make sure it’s Canning and Pickling Salt because it is designed to make a salt brine with salt crystals that are flavorful and intended for pickling. Morton, Ball, and Mrs. Wages are all good canning and pickling brands.
To make the salt brine, combine 2 cups of pickling salt with 1 gallon of water in a large pot. Stir and heat to a boiling. Then pour over the cucumbers.
Now you will want to use weights or plates to weigh the pickles down so they don’t float. You can purchase weights that are intended specifically for weighing down pickles while in the brine, or you can use a few heavy plates that fit inside the crock or bucket. Honestly, I use a couple heavy plates, just like my grandma used to.
Now set it in a corner and forget it. Day 1 is done, easy right?
Day 2 – 7: Remove the weights or plates and stir the pickles with a long wooden spoon. Replace the weights and plates carefully trying to get all of the cucumbers submerged in the brine. Repeat this once a day. So EASY!

Stirring the pickles once a day discourages a film to form. You may not notice anything the first few days, but towards day 5 and 6 you will notice that the brine is a little cloudy and the pickles are starting to change color. This is normal.
Day 8: Pour the cucumbers into a large strainer in the sink. Rinse cucumbers and wash out the container. Next you are going to cut the cucumbers into bite size pieces about 1/2″ thick. Put the cucumbers back into the container.


Make a batch of alum water by combining 1 Tablespoon of alum with 1 gallon of hot water. Bring to a boil and make sure the alum is dissolved. Pour into the container over the pickles. Weigh down with a clean plate.
Alum is what makes the pickles nice and crispy. This recipe calls for alum. I have also used Mrs. Wages Xtra Crunch in my dill pickle recipes. I plan on trying a batch of sweet pickles next summer with Mrs. Wages Xtra Crunch instead of Alum.
Day 9 & 10: Each day, strain the pickles into a large strainer; pouring the alum water down the drain. Return the cucumbers to the container. Make a fresh batch of alum water each day with 1 gallon of water and 1 Tablespoon of alum. Bring to a boil and pour over the cucumbers. Weigh down with a plate.
Day 11: Drain the cucumbers and wash the container. Let cucumbers drain in the sink while you make the syrup.

To make the syrup, combine 10 Cups of Sugar, 5 Cups of White Vinegar, 18 drops of cinnamon oil, 18 drops of clove oil, and 2 Tablespoons of celery seeds. You can also add a few drops of green food coloring if you want to make the pickles a darker green, this is optional. One time my mom made a batch blue for fun.

Return the pickles to the cleaned container. Then bring syrup to a boil and pour over the pickles. Weigh down with a clean plate.

Day 12 & 13: Using the plate to keep the pickles in the container, pour the syrup into a large pan. Don’t drain the syrup down the sink! Reheat the syrup to a boil and pour back over the pickles. Make sure the pickles are weighed down and not floating. Repeat this process each day.
Day 14: Last day! You made it! Time to put the pickles in the jars.
First make sure you have clean jars. Pint jars or half pint jars work great. I have used quart jars before when I have run out of pint jars.

Just like you did on days 12 and 13, pour the syrup into a large pan. Pack the pickles into the jars. I use a canning funnel to help get the pickles in. ONLY pack the pickles to just under the neck of the bottle. You will fill the syrup up to the neck of the bottle and don’t want the pickles to be too high and not covered in syrup. You can find one in a canning kit like this from Amazon.

Once all the jars are packed, heat the syrup on the stove to a boil. Pour the syrup into the bottles just up to the neck. You need to cover the pickles and leave a headspace in the jar.

Heat water in a large sauce pan on the stove. Heat the lids in the water for just a little while. Using a paper towel dipped in the hot water, clean the tops of the jars off making sure everything is clean with no syrup or celery seeds that could cause the jars not to seal.

Once the jars are clean, put the lids on the jars and screw on a ring to the jar. Tighten the lids until just tight, don’t over tighten the rings. I use a magnetic lid tool to get the rings out of the hot water.
When the water in the large sauce pan has come to a boil, you are ready to seal your lids. You are going to flip each jar over and put them top side down into the boiling water. You want the water to come up about an inch or two on the jars. Not all the way to the top. Move quickly and get as many jars in to the pan as you can.

Set a timer for 5 minutes. Let the jars stay in the boiling water.
After 5 minutes in the water, you are going to want to use two hot pads to get the jars out of the boiling water. Quickly flip each jar over and place on a towel on the countertop.
Repeat this process until all the jars have been in the boiling water for 5 minutes.
Now let them sit on the countertop for one day. Do Not Touch the Tops! You don’t want to force a seal of the lids. You will know they are sealing when you hear a POP!
Check each lid the next day to see if they sealed. If they didn’t seal, take the lid off, clean the top, and repeat the sealing steps. Some problems may be chips in your jar tops or stuff on the inside of the lids. Try again.

You can always, make the pickles and keep in your fridge for a while if you don’t want to seal them. However, I always like the pickles more when they have had time to sit and soak up the syrup for a few months.
Enjoy with Crackers, Cheese, and Meat. I love to eat them with Roast Beef and on Roast Beef Sandwiches. I also love them diced up into small pieces in egg salad and a little of the syrup in deviled eggs. They are great with veggie trays and as a snack for parties. How else do you like to eat them?

Expert Sweet Pickles
Ingredients
- 50-75 pickling cucumbers (about 3" to 4" in length, not fat)
- 2 C coarse pickling salt
- water
- 3 Tbsp alum (use 1 TBSP at a time)
Pickling Syrup
- 10 C sugar
- 5 C vinegar
- 18 drops cinnamon oil
- 18 drops clove oil
- 2 Tbsp celery seeds
- green food coloring (optional)
Instructions
Day 1
- Wash pickling cucumbers and place in a stone crock or large container.
- Combine pickling salt and 1 gallon of water.
- Bring to a boil and pour over cucumbers.
- Weigh cucumbers down with preserving weights or heavy plates.
Day 2-7
- Remove weights or plates and stir pickles once a day.
- Replace the weights and plates making sure cucubmers are emursed in the salt brine.
Day 8
- Pour cucumbers into a large strainer. Rinse thoroughly with cold water.
- Wash container also.
- Cut off both tips of the cucumbers and toss, you don't want to use about 1/4" of each end. Cut cucumbers into bite size chunks or desired size and return to container.
- Make alum solution by combining 1 gallon of water and 1 Tbsp of Alum.
- Bring alum solution to a boil then pour over pickles in container.
- Weigh cucumbers down with preserving weights or heavy plates.
Day 9 & 10
- Drain cucumbers into a strainer.
- Make new alum solution each day with 1 gallon of water and 1 Tbsp of Alum.
- Bring alum solution to a boil then pour over pickles in container.
- Weigh cucumbers down with preserving weights or heavy plates.
Day 11
- Drain cucumbers into a strainer.
- Wash container.
- Return cucumbers to the container.
- Make syrup by combining sugar, vinegar, cinnamon oil, clove oil, celery seeds, and green food coloring.
- Stir and bring to a boil and pour over pickles in container. Careful not to let this boil over the pan! It bubbles quickly once it boils.
- Weigh cucumbers down with preserving weights or heavy plates.
Day 12 & 13
- Each day drain the syrup solution into a pan, leaving the cucumbers in containter.
- Bring syrup to a boil.
- Pour over cucumbers and weigh down.
Day 14
- Drain the syrup solution into a pan.
- Pack cucumbers into clean hot glass canning jars.
- Bring syrup to a boil.
- Fill jars with syrup just up to the neck of the jar making sure to cover the cucumbers.
- Clean the top of the jars.
- Heat lids in hot water then put one lid and a ring on each jar.
- Heat 2 inches of water to a boiling in a large pot.
- Flip jars upside down and place in boiling water.
- Process for 5 minutes.
- Flip jars over and place on a towel on the contertop.
- Let sit for a day. Don't touch.
Day 15
- Check to make sure each jar sealed.
- If they didn't seal, repeat sealing process from day 14.
- If they did seal, clean jars so they aren't sticky, dry, and put in pantry.

The Best Chocolate Chip Zucchini Cake Ever
If you have ever planted one zucchini plant in your garden, you will know that one plant can feed a neighborhood for the entire summer. Why is it that this plant can produce 10-15 huge zucchinis in one week? Why can’t it be a more appealing fruit like a pineapple. I would love to have 10-15 fresh pineapples come off of my zucchini plant in one week. Why does it have to be zucchini that takes over the entire garden?

I feel like planting a zucchini plant should almost be a crime because people start sneaking around and leaving zucchini on porches and in cars and leaving them in baskets by the side of the road. “Free – Please take some… Please!” Even mothers start hiding zucchini in every dish they can get away with. It started with bread and now has moved to cakes, pancakes, meatballs… etc.
This year we planted one plant. It is now huge and producing many zucchinis a week. I try to pick them while they are young and little, but somehow, I still end up missing one and finding it later when it’s huge.
Small zucchinis are perfect for steaming and eating as a vegetable, making zoodles with and dicing into other vegetable side dishes. Large zucchinis are best for peeling, seeding, shredding, and adding into breads and other baked goods.
Once the zucchini gets too big, it’s best to just make a boat out of it and send it down the river.
This is our favorite chocolate zucchini cake. I have already made it twice this summer. It’s delicious! And if you think like my husband, it’s nutritious too because it has zucchini in it, so you can eat your cake and get your veggies too!

I added Flaxseed to the recipe and it was great! It’s completely optional, but if you are like me and bought a huge bag of flaxseed from Costco and are looking for recipes to through it into, give it a try!

First step make sure you have all the ingredients and grate the zucchini. If you have more than 2 cups, you can freeze it in freezer bags in 2 cup increments so you can make this recipe again in the winter. I use a kitchen aid mixer with a grater attachment to grate the zucchini. Works like a charm!!!

You don’t have to put this cake in a bundt cake pan. I did for fun. You can make it in a couple loaf pans, a 9X13 cake pan, or even as yummy muffins.

Chocolate Chip Zucchini Cake
Ingredients
- 1/2 cup unsalted butter
- 1/2 cup oil
- 1 3/4 cups sugar
- 1/2 cup brown sugar
- 2 eggs
- 1 Tbsp vanilla
- 1/2 cup buttermilk
- 2 1/2 cups flour
- 1 tsp baking soda
- 1 tsp baking powder
- 1/2 tsp salt
- 1 tsp cinnamon
- 4 Tbsp cocoa
- 2 Tbsp ground flax seed (optional)
- 2 cups grated zucchini
- 1 cup chocolate chips
Instructions
- Cream together butter, oil, sugar and brown sugar.
- Add eggs, vanilla, and buttermilk.
- In a separate bowl, mix dry ingredients. Then add to creamed mixture.
- Add grated zucchini and chocolate chips, stir well.
- Pour into a greased pan. (Bundt pan, 9×13 inch baking pan, 2 loaf pans…)
- (Option 2: save brown sugar and chocolate chips until the end. Mix together and sprinkle over cake batter.)
- Bake at 350 degrees for 45-50 minutes.

Enjoy and serve on something pretty!
Here are some of my favorites:
Quarantine Birthday Party Ideas
Millions of people are going to have birthdays during “Social Distancing” and “lockdown” times. If you are like me, you may be wondering what do you do for a teenager who is having a birthday during. Here are some fun ideas for a social distancing birthday party.
Virtual Birthday Ideas

Set up a birthday party on Zoom or other social meeting platforms. Kids just want to see their friends and having a party when they can invite all of their friends and just talk is great. Make sure to send out the invite at least a day before. Hey people aren’t going anywhere so most people will be able to come. Also, it’s best to be on a computer so you can see all of your friends at once. Watching from your cell phone gets jumpy as the screen jumps around from person to person and you don’t see the people who don’t talk much.
I’m sure by now most of us are pretty familiar with how to get onto a virtual meeting, but what do you do at a virtual party? How can you make a fun kids party so the kids have some fun games to play?

Here are some ideas…

- You Are Not Invited
- One of my favorite ideas from the Quarantine Birthday Parties is the taped off stay out look. Tape off the house in caution tape and send out “You Are Not Invite” invites.
- “Around the World” Zoom Party.
- If you could be anywhere in the world on a fun vacation right now, where would you be. Ask your friends to dress up or set their backgrounds up as if they were on vacation. Take turns guessing where everyone is and dreaming of wonderful vacations hopefully soon to come.
- “Celebrity Look A Like” Zoom Party.
- If you could be anyone or meet anyone, who would you be. Ask your friends to dress up like a celebrity or famous person. It’s fun to dress up, guess, and laugh with the costumes your friends come up with just from their houses.
- Headbandz game through zoom.
- You can send an envelope with a character card for each guest prior to the party. My niece attended a frozen party on zoom with this game. Each kids received an envelope with a note to not peak at the card. During the party the kids take turns guessing who their headbandz character is.
- Dance party zoom activity.
- Have everyone dance to your favorite music just over zoom. Some people may be too timid, but other others may have fun and let loose. Have fun!
- Scavenger Hunt zoom activity.
- Make a list of the birthday kids favorites things. Then tell your friends to go find it. First one back gets a point or wins. For example tell everyone to go find the birthday person’s favorite animal. You can tell them that it’s a panda or you can see what everyone thinks it is and comes back with.
- Would you rather game.
- Ask your friends would you rather questions about the birthday kid. This is a fun activity and game that can take about 5-10 minutes.
- Favorite things game.
- Ask your friends what they think your favorite things are. This is another activity that can take about 5-10 minutes.
- Send out a “Flat Stanley” picture of the birthday kid to family and friends.
- If you have time, mail it to them, print it off and deliver it to them, or have them print it off. The point is to take “Flat Stanley” on a birthday adventure and take a picture of what you did together. You never know what fun pictures you may get back. This is a fun and interactive way to celebrate with family and friends from anywhere.
- Virtual Video messages
- You can have friends and family send a short video birthday message to you. Throw them into iMovie or PhotoShop Premier or other video editing program and add some music to it. It’s fun to watch these videos and you can watch them over and over. (If this is too much, as your video savvy family member to help. It doesn’t have to be complicated.)

Don’t forget that you can do party favors but these take a little more planning and preparation to put together than usual and take a little pit of time to drive around to all of your friends houses. If you do, make sure you have plenty of time to get around to everyone and have a few moments to talk and say hi.
Of course some of the most memorable events to come out of the COVID-19 pandemic are…
Drive By Birthday Parties.
You know you love having a reason to get out of the house even for just a little while. Drive by birthday parties are lots of fun and can be so easy to throw.
- Make sure you set up a time and a route so people know how to drive by without driving the wrong direction or showing up when the birthday kid isn’t outside to see them.
- Decorate the yard with Happy Birthday yard signs or a balloon tower.
- Don’t forget the camera man. Take pictures and record this fun birthday party. It will definitely be one to remember.
If you are invited to a drive by birthday party, it’s always fun to throw out candy. Or you can do as my dad did at my niece’s birthday and throw out dollar bills.
One fun way to keep the party simple is just to have a family party. No stress and no frills. But don’t forget to do something fun. You can play all of the fun birthday party games and have a piñata or plan a Family Olympics with fun games.
No matter what you do for a Quarantine Birthday Party, remember to HAVE FUN! One day, these parties will be a thing of the past, but we can remember the fun times we did have midst the days that seem like all the other days.
Have you had a Quarantine Birthday Party? I’d love to hear your idea too. Comment Below.

Peanut Butter Cookies
This recipe is an old family favorite. A tried and true recipe from my Grandpa John.

Currently we are “sheltering at home” during the Coronavirus pandemic. I made a batch of these cookies because they are so good and we all were in need of a little comfort food.
It made 4 dozen cookies.
That same day, we found out our friend cut his finger almost off and had to have emergency surgery to put it all back together. I asked if he would like some cookies and dropped some off on his porch.
Is it weird that we have to ask our neighbors if they would like something we would normally give so freely? Nobody wants anybody else’s germs. Is social distancing going to turn us all into germaphobes? When will we be able to get back to a normal, social, life?
For now, enjoy this yummy Peanut Butter Cookie recipe and maybe you can find someone to share it with.
Much love from my family to yours.


Peanut Butter Cookies
Ingredients
- 1 C white sugar
- 1 C brown sugar
- 1 C butter
- 1 C peanut butter
- 3 C flour
- 2 eggs, beaten
- 1 tsp baking soda
- 1 tsp vanilla
- 1 pkg. Peanut Butter Chips
Instructions
- Cream butter, sugars, and peanut butter together in a mixer.
- Add eggs and vanilla. Mix.
- Add dry ingredients and mix until just combined.
- Add peanut butter chips, use a large spoon to hand mix until dispersed throughout dough.
- Make into 1 inch balls, put on a cookie sheet.
- Press flat with a fork in 2 directions.
- Bake at 350° for 13 minutes or just until light golden.
If you don’t have a cookie scoop, you should get one! I love mine and use it for cookies and meatballs.
Banana Chocolate Chip Muffins


I came across this Banana Chocolate Chip Muffins 15 years ago. It quickly became one of our family favorite recipes and my go to way to use ripe bananas. My family always gets excited when they find out that I’m making these.
These don’t last long at my house. With 4 growing kids and a husband who works from home, these go very quickly. I usually end up doubling the recipe if I have more bananas.

Over the years I have tweaked the recipe until I finally feel like its perfect. Although, my husband did love when they would come out gooey but I was always worried about them being undercooked and going to get us sick.
If you want to try them a little gooeyer, use 1/2 cup less flour and only cook them for 12 minutes. That’s close to the original recipe.

Next time you have ripe bananas, give this recipe a try. Let me know how it goes for you! We love it!

I remember the big windstorm that of 2011. We were living in Farmington Utah and our city was hit with 110 mph winds. There was a lot of damage and trees down. Then we got word that another windstorm was on its way. Church was canceled and all able bodied hands were asked to go help clean up the debris so it wouldn’t cause more damage in the storm to come.
My husband headed out with the work crews, but I was pregnant and home with 2 young kids. I remember thinking, “What can we do to help?” By some divine design, my mother had left on a trip a couple days earlier and had left me 2 bunches of ripe bananas. Now I knew exactly what we were going to do with the bananas.
The kids and I made a bunch of banana chocolate chip muffins and drove around the neighborhood to all the crews we could find passing out these muffins.
The next time life gives you a bunch of ripe bananas, maybe you can make a bunch of muffins for your neighbors.

Banana Chocolate Chip Muffins
Ingredients
- ½ cup butter (softened)
- 1 ¼ cup sugar
- 2 eggs
- 1 Tbsp vanilla
- 2 cups flour
- 1 tsp baking soda
- ½ tsp cinnamon
- 2 very ripe bananas
- ½ cup mini chocolate chips
Instructions
- Line 2 muffin tins with 18 paper liners. Fill extra muffin cups 1/2 full of water if needed.
- Preheat the oven to 350°.
- Cream together the butter and sugar until light and fluffy.
- Add the eggs one at a time.
- Add the vanilla.
- In a separate bowl, combine the flour, baking soda, and cinnamon.
- Slowly add dry ingredients into the wet ingredients until just blended.
- In the same bowl the dry ingredients were just in, mash the 2 bananas.
- Mix the bananas into the batter until just mixed.
- Add the choclate chips. Mix until just disperesed. Don't over mix.
- Spoon the batter evenly into the 18 muffins cups.
- Bake for 15-18 minutes until golden brown.
Wisconsin Cauliflower Soup
Yesterday was the first day of the kids being out of school due to the Coronavirus. Making sure family and friends are well and taken care of has now become the most important thing in everyone’s lives. Nobody knows what tomorrow is going to bring and what new closures are going to happen and for how long.

Thankfully we are doing well. We have always had a good food storage supply. I didn’t even go shopping during the chaos of the weekend, although my husband did go get a couple bags of cat food. We will be okay.
My husband bought a cauliflower a little over a week ago, before all of the chaotic shopping began. I had most of the ingredients needed to make this recipe, which is one of our family favorites. I did swap out the half and half for a can of evaporated milk and I didn’t have pepper jack cheese, so I only used sharp cheddar.

It still tasted so good! My kids loved it and ate it up so fast. We barely had one bowl left over (which I ate for lunch today.)
Even after this crazy pandemic passes, this comfort food soup is the best! I know you will love it!
Wisconsin Cauliflower Soup
Ingredients
- 3 T butter
- 1 cup onion
- ¼ cup flour
- ½ tsp salt
- ¼ tsp pepper
- 1 cup half and half
- 1 cup milk
- 1 ½ cups water
- 1 (14.5 oz.) can chicken broth
- 1 head cauliflower (about 2.5 lbs)
- 1 tsp Dijon Mustard
- 1 ½ cups sharp cheddar cheese
- ½ cup pepper jack cheese
Instructions
- Melt butter in a large sauce pan and add chopped onion. Saute for about 10 minutes until onions are translucent and golden.
- Slowly add flour and stir to make a roux.
- Heat while stirring for a couple minutes until roux is a golden brown.
- Mix the half and half and milk together. Slowly add to the roux in small increments keeping the roux hot.
- Once all the milk is added, add the water and chicken broth, stir constantly.
- Add the chopped cauliflower.
- Reduce heat and simmer, covered, until the cauliflower is tender. About 15 minutes. Stir occastionally.
- Using an immersion blender, blend until smooth. (You can pour soup into a regular blender if you don't have an immersion blender. Be careful and vent the top and cover it with a paper towel to allow steam to release while reducing splatters.)
- Once everything is thoroughly blended, return it to the sauce pan.
- Heat over medium heat until hot, stirring occastionally.
- Remove saucepan from heat and add mustart and cheese. Stir until cheese is melted and smooth.
- Serve topped with a little cheese and oyster crackers.

What else do you do with all of the leftover cauliflower from veggie trays?
Jello Art Characters
A couple weeks ago, my nephew had a Black Panther Birthday party. When I asked my sister-in-law what I could bring to the party, she quickly replied that she wanted me to bring a jello. AND NOT JUST ANY JELLO…. A BLACK PANTHER JELLO.
What!? How was I going to do that?
I thought about it for a few days and decided to go about it by tracing the character’s outline first and then filling it in. Just like you would with a iced sugar cookie.
It worked perfectly. I used a flower tip to create the necklace on Black Panther and then just used a straight tipped needle and syringe to create the rest.

Follow these links to get the recipes for the Clear Gelatin Base and the Colored Gelatin Base.
With this technique, the POSSIBILITIES ARE ENDLESS.
You can create anything you want.
Black Panther.
Hulk.
Santa.
Elsa.
Rainbow Bright.
Whatever your fandom is.
JUST REMEMBER THAT THE JELLO IS MIRROR IMAGE OF WHAT IT WILL LOOK LIKE FINISHED.
I did write my nephew’s name on the jello, but I had to write it backwards.
One of these days I’m going to invest in some alphabet molds that are typically used with fondant. But I know they would be perfect for jello. Then I won’t have to worry about my handwriting on the cakes.
Also, I had to use Knox Brand Gelatin while making this gelatin cake because my nephew’s name is Knox. What’s more fitting than using Knox Brand Gelatin to make his birthday jello cake.
Below are some links to some products on amazon that you could use to create your own jello art characters. (I know it looks funny to have needles and syringes on my website. This is not a medical page, a diabetic page, or a drug addict page. It’s a jello art page and yes, we use needles and syringes to create our art.)

What kind of characters do you think you will try? What kind of characters do you think I should try sometime?
A Year Of Jello Creations
One year ago, I received my first set of Gelatin Flower Tools for Valentine’s Day from my husband. Who would have thought that it was a great gift? I did! It brought me flowers and smiles all year long.
Here is a compilation of all my jello pictures over the last 12 months including the good, the bad, and the ugly Minnie Mouse.
I love seeing how my flower making skill and photography skills have improved in just a year. I found some pictures that never even made it to my instagram feed.
Some of the jellos were made by my kids. They are getting pretty good now too. Belle’s blue flower went onto State for reflections. Just waiting to hear back from the competition now.
Which ones are your favorites? Comment below.


