A couple weeks ago, my nephew had a Black Panther Birthday party. When I asked my sister-in-law what I could bring to the party, she quickly replied that she wanted me to bring a jello. AND NOT JUST ANY JELLO…. A BLACK PANTHER JELLO.
What!? How was I going to do that?
I thought about it for a few days and decided to go about it by tracing the character’s outline first and then filling it in. Just like you would with a iced sugar cookie.
It worked perfectly. I used a flower tip to create the necklace on Black Panther and then just used a straight tipped needle and syringe to create the rest.

Follow these links to get the recipes for the Clear Gelatin Base and the Colored Gelatin Base.
With this technique, the POSSIBILITIES ARE ENDLESS.
You can create anything you want.
Black Panther.
Hulk.
Santa.
Elsa.
Rainbow Bright.
Whatever your fandom is.
JUST REMEMBER THAT THE JELLO IS MIRROR IMAGE OF WHAT IT WILL LOOK LIKE FINISHED.
I did write my nephew’s name on the jello, but I had to write it backwards.
One of these days I’m going to invest in some alphabet molds that are typically used with fondant. But I know they would be perfect for jello. Then I won’t have to worry about my handwriting on the cakes.
Also, I had to use Knox Brand Gelatin while making this gelatin cake because my nephew’s name is Knox. What’s more fitting than using Knox Brand Gelatin to make his birthday jello cake.
Below are some links to some products on amazon that you could use to create your own jello art characters. (I know it looks funny to have needles and syringes on my website. This is not a medical page, a diabetic page, or a drug addict page. It’s a jello art page and yes, we use needles and syringes to create our art.)

What kind of characters do you think you will try? What kind of characters do you think I should try sometime?
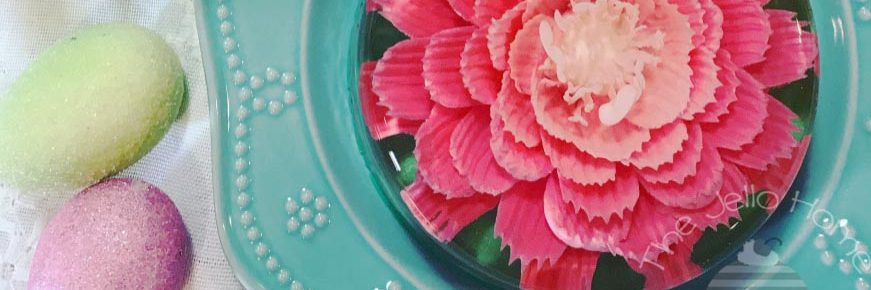
Colored Base for Gelatin Flowers
You will want this recipe for eye-catching, beautiful flowers that stand out from within the clear gelatin base.

When I first started making gelatin flowers, I started with ingredients that I already had in my pantry. However, the colors were translucent and not very vibrant. A few of the must have ingredients that I use to create beautiful colors for the gelatin base are whipping cream and white food coloring.
At first I used milk instead of cream, however, once seeing the difference in the flowers and especially tasting the difference, I use whipping cream instead. It makes so much of a difference.
Next, I started adding white food coloring. It just made the colors pop and so beautiful. Here are a couple links to some on Amazon. The Americolor is a better deal for 6 oz. But the Wilton 2 oz. bottle is enough to get you started.
You will also need some syringes and needles before you get started. I have seen posts where people use cut straws to do this, but it is so much easier with the right tools. There are tons on Amazon to choose from, but here are some of my favorites. Also, if you want a starter kit will all of the things you need to get going, Check out the Gelatin Art Starter Kit.

Colored Base for Gelatin Flowers
Equipment
- Syringes
- Needles or Flower Tips
- Pan on the stove with a warm water bath to keep gelatin from setting up
Ingredients
- 1 Tbsp gelatin powder
- 3 Tbsp cold water
- 1 Cup heavy whipping cream
- 1/2 Cup sugar
- 1 drop food flavoring
- 3/4 Tbsp white food coloring
Instructions
- First, make the clear gelatin recipe and make sure it is set before you begin creating the colored gelatin for the flowers.
- Mix gelatin with cold water and let stand for 5 minutes.
- Heat sugar with 1/2 Cup of cream in a sauce pan, stirring constantly. Remove from heat when vapor appears above the surface, do not let it boil.
- Add gelatin and stir until completely dissolved, then add the remaining 1/2 Cup of cream.
- Stir in one drop of food flavoring.
- Mix in the white food coloring using an emulsion blender, or a regular blender if you don't have an emulsion blender.
- Put back onto the stove on a very low heat to keep the gelatin warm. Stir occasionally.
- Get the clear gelatin out of the refridgerator. Cut a small circular hole in the middle of the top of the set clear gelatin.
- Pour some of the colored gelatin base into a small bowl or glass. Color it with food coloring.
- Using a syringe and a needle, inject the colored gelatin into the clear gelatin base. Play around with different techniques and designs and colors. It is easier than it looks and fun to create.
- Keep the colored gelatin woarm in the water bath while you are creating with other colors. You don't want the gelatin too hot or too cold. Also having boiling water in a couple other cups in the water bath is good to clean the needles and syringes when needed so they don't get clogged.
- Have fun!

Creating a mess is just part of the fun! Here’s a behind the scenes picture of the mess I create while making a flower.

Can you tell which flowers were made without white food coloring and used milk instead of heavy whipping cream? I can. The first two flowers are so much more translucent than the last two flowers. Trust me. There’s is a huge difference in real life.


Simple Recipe for a Great Tasting Clear Gelatin
The first time I used clear gelatin for a recipe, I wanted a white color and only flavored it with milk. It tasted terrible. I steered clear of clear gelatin for years after that.
Then I decided to make gelatin flowers and knew I had to learn how to make a great tasting clear gelatin. This clear gelatin recipe is a winner. It is also the perfect consistency for creating beautiful gelatin flowers in.
First, there is a difference in clear gelatin. Not all clear gelatin is created equal. Some are a little yellow in tint while some are super clear. I prefer to use Super Clear Gelatin I bought on Amazon. It is crystal clear. You can find the link here. Some gelatins are made from different animals, you can find Kosher gelatin.
Also the bloom rating on gelatin can be different. The bloom rating ranges from 30 to 300. A higher rating will gel faster and be stiffer. What does it mean to bloom gelatin? If just means you add water to it and let it sit for 5 – 10 minutes. Doing this will ensure the gelatin will dissolve I the warm ingredients and won’t cause clumps or grainy residue.
First step, is to add your gelatin to a cup of water and let rest and bloom for 10 minutes.

Next, while your gelatin is blooming, mix the sugar, citric acid and remaining water in a saucepan and stir until clear and dissolved. Do not let the liquid come to a boil.
Do not add too much citric acid. I once added a Tablespoon of citric acid instead of a teaspoon and it tasted terrible! I made a beautiful flower, but nobody wanted to eat it.

Next, add your gelatin to the saucepan and stir until dissolved. Using a medicine dropper, add your food flavoring. Don’t add too much! Only a couple drops are needed. When I’m creating a clear gelatin, I always make sure to use a clear food coloring. I use the little containers of food coloring that you may be familiar with when flavoring suckers. It may be hard to find clear colors at the store, here is a link to some on Amazon.
Some of our favorite flavors are Strawberry-Kiwi, Cotton Candy, and Tropical Punch.
Finally, pour your gelatin mixture into the a bowl or container of your choice and refrigerate for a few hours until set.
Next, follow this link to the recipe for the opaque gelatin base to make your flowers.

Links to everything you need:

Clear Gelatin
Equipment
- medium saucepan
- medicine dropper
- bowl
- small whisk
Ingredients
- 3 Tbsp clear gelatin powder
- 2 C sugar
- 4 C water
- 1 tsp citric acid powder
- 3 drops clear food flavoring
Instructions
- Mix gelatin with 1 cup of the cold water in a small bowl and let it sit for 10 minutes. In a saucepan, heat sugar with citric acid powder and remaining 3 cups of water. Stir until the sugar is dissolved. Remove from heat when vapor begins to appear above the surface. Do not let it come to a boil. Take off heat.Add gelatin to saucepan and stir until completely dissolved. Using a medicine dropper, stir in just 3 drops of food flavoring. Go ahead and taste it to make sure flavor is right. Pour into desired containers and leave in the refridgerator until set.

First Jello Flowers – Mistakes and Success
The first night I got the gelatin flower tips, I was so excited. However, I didn’t have any clear gelatin in the pantry so I decided to try to make flowers in some Jello I already had on hand. It did NOT work. The colors of the gelatin I had were too dark and you can’t even tell that I tried to put a flower in the jello. Don’t try it. It’s not going to work.
(Also, I love to use my Great-Grandma’s Corelle vintage dishes. They are my go to dishes for lunch and when I just need a plate. Love them.)

So the next day I went to the grocery store and bought a package of Knox clear gelatin and some flavoring. **Note – You have to flavor clear gelatin. I tried to use a clear gelatin once years ago and didn’t flavor it. It was terrible. Don’t make the same mistake. Check out this post on my clear gelatin recipe.
That night, I created my first successful gelatin flower. It turned out amazing and it really wasn’t that hard. It’s pretty easy for an impressive effect.


Here are some links to some products that. can help you get started with your first gelatin flower. Make sure you get clear flavors for the clear part of the gelatin.

I’d love to see your first jello flowers. Please leave a comment and link below.
Jello Flower Tools
Who gets excited to get needles and syringes for Valentine’s Day? I do! And no, not druggie needles! I’m not like that! I’m talking about Gelatin Flower making needles and syringes. My husband knows me so well.

To make beautiful gelatin flowers, there are a few things that will make it super easy. First, you need to get a set of special needles and syringes. Some tips are little, some are big and flat. Some are pointed and some are rounded. Some of my favorites have zig zag edges and others are shaped like leaves.

My husband bought me this starter set from Amazon with 30 tips. It has been great. I also bought myself a set of syringes with long needles.
Here is another great beginning option for flower tips that includes a straight tip, you can start with this smaller set from Amazon. I also included another link for a complete starter kit that has tips, gelatin and lots more.

If you like to create Gelatin Flowers, what are your favorite tips? I’d love to hear from you. Please leave a comment below.
Jello Like You’ve Never Seen Before

Well Hello! I am so excited that you are here! Dreams really are coming true because I have dreamed of starting this website so many years. To introduce myself, my name is Danica and I love creating fun jello dishes and jello art.
It has been a hobby of mine for over 20 years. I started by bringing a jello trifle to missionary farewells of family and friends. It was a super yummy jello with strawberry or raspberry jello, strawberries and bananas, and banana pudding. Super easy and very good. Pretty soon, family started requesting me to bring the jello.
Now, Christmas Eve would not be the same without my 16 Layer Jello Trifle. Over the years, my jello creations have become sort of a challenge for me to always see if I can one up my jello from last year. I have looked around the internet and nobody does a jello trifle quite like mine.
They keep telling me that I need to write a jello cookbook. And I’d love to. That is another dream of mine. For now, I decided to start this blog as a stepping stone to that elusive cookbook one day.
Earlier this year I started the Jello Home on Instagram and on Youtube. My kids love getting involved in the videos on Youtube. I am still trying to figure things out, but hey everyone has to start somewhere. But if there is one thing I do know, it’s jello. I’m super excited to start sharing some of my favorites with you and I’d love to see your jello and gelatin dishes too.
Be excited for more fun to come!
Contact Us
We would love to hear from you and possible work with your company.
Contact Danica at thejellohome@gmail.com.

Check us out:
Instagram – @thejellohome
Youtube – thejellohome https://www.youtube.com/channel/UCV2fBD9Jmc3a9XbcRJfDvuw