Christmas is a time for the best family traditions and lots of great food. The one food that I always make for Christmas Eve is a Jello Trifle. I have been bringing a Jello Trifle to my family Christmas Eve party for at least the past decade. Every year, the trifles get more and more elaborate.
This year I was super excited to add gelatin flowers to the jello trifles. It took a lot of work and they were gone in super fast, but it wouldn’t feel like Christmas Eve without a jello trifle for our family.

I’ll walk you through step by step on how I made these amazing Jellos. I started at night on December 22nd by making the clear gelatin and pouring it into 2 pans of muffin tins and 3 round bowls.
But I made a big mistake. I wanted to triple my regular recipe so I used an older pan. One that I never used before while making jello. Well, the pan left little black flecks of non stick coating all throughout my jello. I picked a few out and thought maybe I had them all. But it kept bugging me all night when I would think about it.

When I woke up in the morning, I went to check on the jellos and I could tell that little black flecks were throughout all of the jello. I didn’t want to eat it and no way was I going to serve it to my family. So I scooped out all of the clear gelatin and threw it away, along with the terrible old pan. Boo!
So back to step one again. I grabbed a newer pan and didn’t it all over. But this put me hours behind where I wanted to be.
Click here for the recipe for the clear gelatin base.

Hours later I finally was able to start the gelatin flowers. First, I scooped out a small hole in the middle of each gelatin. Then I made 24 poinsettias in the 2 muffin pans. One pan of white poinsettias and one pan of red.
Click here for the recipe for how to make the gelatin flowers in the clear gelatin base.


After I made the small poinsettias, I made 3 large poinsettias.

Here comes the tricky part. Getting the small jello flowers to stick to the edge of the trifles and creating a hollow middle so I could fill it later with layers of jello.
I found 2 Tupperware containers that were just the right size for what I needed. I put the Tupperware in the middle of each trifle dish and then put the gelatin flowers in alternating colors around them. I had just enough flowers to make 2 layers of flowers in one trifle and one layer of flowers in the other.

Next I made another recipe of the clear gelatin base and poured it into the cracks around the small flowers.
I am not going to lie… THIS IS WHERE IT ALMOST ALL CAME APART!!!
THE TUPPERWARE STARTED FLOATING AND ALL THE FLOWERS STARTED GOING UNDERNEATH THE TUPPERWARE!!! AHHHHH! NOOOO!!!!
Quickly, I had to get the Tupperware out, and get the small flowers out. However, we had one casualty. One red flower got chopped into pieces in the process and didn’t make it.
I wasn’t ready to give up yet. I cleaned out the trifle dish and tried again.
This time I put water in the Tupperware to keep it from floating. It worked. I put the small flowers around the Tupperware and poured the clear gelatin around it. I used a small tool to get the bubbles out the of cracks. Then I put the trifles in the refrigerator to set up for a couple hours.
When it came time to get the Tupperware out. I carefully poured the water out into the sink. Then I poured boiling water into the Tupperware to warm the surrounding gelatin and get the Tupperware to release easily. After just a few seconds, the Tupperware was able to come right out.


Finally after all that work, it was time to start the first layer of jello.

I like to make my layers with jello, evaporated milk, water, and ice. It’s a really easy recipe.
First off, I use the larger boxes of Jello solely due to price. I buy the larger boxes of when they are on sale and always have a stock in my pantry. You can use the smaller boxes if you would like. I just get out my kitchen scale and measure out 3 oz. so I know I’m using half the box.

Layered Jello Recipe
Ingredients
- jello
- boiling water
- cold water
- ice
- evaporated milk
Instructions
Regular Jello Layers
- Pour 3 oz. Jello into a medium mixing bowl. Add 3/4 C. boiling water and stir until gelatin is dissolved and not grainy anymore. Add 1/3 C cold water and 1/4 C ice to mixing bowl. Stir until the mixture is chilled, but before it starts to set up. Remove any leftover ice cubes. Refrigerate for at least 1 hour or until gelatin seem to be set up.
Evaporated Milk Jello Layers
- Pour 3 oz. Jello into a medium mixing bowl. Add 3/4 C. boiling water and stir until gelatin is dissolved and not grainy anymore. Add 1/2 C evaporated milk and 1/4 C ice to mixing bowl. Stir until the mixture is chilled, but before it starts to set up. Remove any leftover ice cubes. Refrigerate for at least 45 minutes or until gelatin seem to be set up. (Seems to set up quicker than regular layers.)
Layered Jello Instructions
- Alternate between a regular Jello Layer and an Evaporated Milk Layer. In any color pattern of your choosing. Make sure that the layer is set up before pouring the new layer on top. If it isn't set up well, they layer will lift up and float. I like to pour the liquid jello onto a spoon right above the cold jello layer . This helps to disperse the liquid jello without disrupting the layers. I use this recipe and separate the layers into 2 dishes so that they layers are thinner. My 2 trifles will hold 6-7 large (6 oz.) boxes of Jello. That's 12-14 layers! To get the slanted effect of the jello pictured, I carefully tipped the trifle dish in the refrigerator, changing the angle with each layer.


Above are some pictures of this years trifles getting their layers. The picture on the right is as far as I got on December 23rd before heading to bed. If I didn’t have to throw out the clear gelatin in the morning, I could have had it all done on the 23rd, but instead I had to wake up early on the 24th to get the final layers done before the family party later that day.
Because I had the flowers around the outside, it only took 5 layers to fill up one trifle (the one with 2 rows of flowers). It took 7 layers to fill up the other trifle.

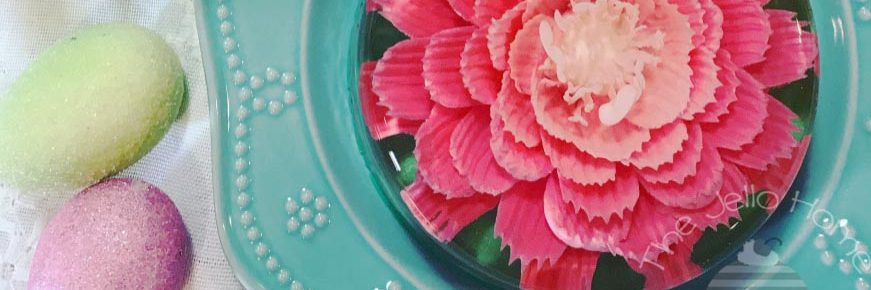
After the last layer set up, I took the larger poinsettia flowers and placed them on top of the trifles. I made 3 because I wanted to assure that 2 turned out good. (All 3 were great.) I took the extra one to the smaller Christmas Eve party at my in-law’s house.
After placing the large flowers on top of the trifles, I made one more recipe of the clear gelatin base. The I poured it around the edges with a little layer going over the top to make sure there was a nice flat top to the trifles.


I finished the last layer about 24 hours after I threw all the bad jello out.
Here’s some pictures of the final products.


The family Christmas Eve party had 59 people there this year. It’s full of family and cousins that I don’t get to see very often. Some who came in from across the country that I haven’t seen for years.
With all those people, these jello trifles were devoured in no time. Do I mind that it took me all day long and it was gone so fast? Nope these jello trifles are made out of love for the best party of the year.

How much Jello was that? I weighed each jello trifle and later subtracted the weight of the dish.
One jello weighed 7.3 lbs, the other weighed 7.8 lbs. In total, that’s 15.1 lbs of jello!
If you made it all the way to the end of this long post, what do you think of all this crazy jello making? I’d love to hear your thoughts and comments.
6 thoughts on “2019 Christmas Jello Trifles”
Comments are closed.
This is amazing edible art! I am just in awe of the work you put into it. What a great tradition.
Thanks Heather! It really is a great tradition.
Wow! What a beautiful and festive dessert. I cannot wait to try this for my family at Christmas!
I would love to see it! Thanks!
Wow! I mean just WOW! This is so beautiful. You have much more patients than I do. I wouldn’t be able to wait for all the jello to set up. You are very talented.
Thanks so much! I know that not many people would take the time to make a jello this detailed. I just love doing it.